Wednesday, April 22, 2015

My Final Model and Environment

I had a very hard time making my model. I had a lot of problems in everything. The UV mapping was the worst for me because i didn't know exactly where to start or how to do it. I'm still iffy about it.

My model Is a robot in a club like environment. The little cylinder object behind my model are pieces of furniture.  I UV mapped everything except those pieces. I know, I know that I have to make my walls a little bit bigger but hey I did my best with the time I had. I didn't know my model was bigger than my environment.

This Is the back of my environment which is the outside of the building.


This is the side view of my environment. The two walls you see are actually the same wall. the one on the right is the original and the left is a copied version. I did that because the UV map for the other wall was really wacko. So I just duplicated the wall.

This is the top view of my model and my environment. The reason why the environment looks so bright is because of the lighting and where its placed. I used and ambient Light and placed it in the center of my environment to brighten the room.

That's my model that I have been working on for eight weeks. Have fun using Maya! XD

Wednesday, April 15, 2015

Just duplicate it

Having problems trying to re due a UV map on a similar object? Just duplicate the thing. I was having problems trying to re due a UV map on a wall for an environment assignment. I did the first wall perfectly but when I tried to do the other two, the map was all off. I asked my professor for help and he told me "Just duplicate it." He showed me how and now I'm going to show you to make your life simple as well.

1) I had three walls and I was trying to make it look kind of like a club theme. My first wall was perfect. So make sure you have your perfect object. In photoshop I had made my texture for the wall like this. I made sure I knew which way the wall had unfolded to make sure everything was positioned  the right way.

2) This is what my wall looked like after I put the texture onto the wall.

3) First thing you do before trying to duplicate your object is to right-click and make sure it is set on Object Mode and select your object.

4) Next go to Edit and then click on Duplicate ( or you could just press Ctrl+D). You have now duplicated your object.

5) Now, click on the Move tool and Rotate tool to move the second wall around.  Keep in mind you're not going to see the wall (or whatever object you are duplicating) appear in a different place. It's onto of the first wall so DO NOT click anywhere else but your move tool. Once you see your second wall then you could do whatever you want to it.

6) Repeat for the other wall. (only necessary if you are duplicating to get three objects)

7) Now, I had realized when I rotated my environment around that both walls had the same backside. 

8) I didn't want that, so what I did was I went back to my original photoshop file of my wall and I changed the backside to a brick wall and saved it as a Targa file like I did for my first wall.

9) Then, I went back to Maya and Right-clicked on my second wall and went down to Assign New Material.

10) After that, an option box popped up and I clicked on Lambert. Do the same.

 11) Once you choose Lambert, on your right side you will see where it says color. Clcik the checkered box next to it and another option box will pop up. Click on File.

12) Find your new texture file and press open.

13) Finally you are done. Steps 9-12 you should have already known but I broke it down just in case anyone was wondering what to do next. Have fun =)

Wednesday, April 8, 2015

Paints Skin Weights Tool

I wasn't all too sure about how to use this tool at first but I kind of got it down now. This tool help you have better control over the way your model moves.

1) Have your model with a skeleton. If you need to add a skeleton ask your professor or go online and find out how to add one and come back. After you have your skeleton, select Skin, Bind Skin, and Smooth Bind. This allows your model to move like a human and not a robot. Now about the weights tool, first of all make sure your model is selected when you are trying to do the next step otherwise its not going to work.

2) Once you have your model selected click under the Animation tab and then double click on the 6th from the last tool. You will open up a tools settings box shown on the left side if the image below. 

3) Make sure the brush that you are using is the soft brush. This will make it so you don't make your model like a complete robot. Now let me explain what you see in the image below. You see where it says the parts of the body with those little pretty colored boxes on the left side? If you Select one of them, what you see on the model will happen. So, the one I'm showing you is the upper leg. You see that white? The whiter the part the more influence it has. The blacker the part means it has less influence. So you see that grey area means that it has little influence over those parts. If you move the upper leg, that part will move slightly.

4) So let me show you what had me messed up. Giving certain parts more or less influence. How to give less influence. Press Ctrl+left click. This will turn the white parts darker. But here is the tricky part, you have to make sure it's over one of the joints of the skeleton in order for it to actually make a change. It sounds harder than it looks. you'll understand once you try it.

 5) How to give more influence. This is easier, all you have to do if left click. But remember you have to be over a joint. Make sure to rotate your model as well to make sure there is no white or black on the back where there shouldn't be because it doesn't select/deselect the parts all the way around.


6) Remember you can do this to each part of the body so don't forget to do it to the other parts as well. Now go use the Move tool to move your parts around to see if you gave the right amount of influence to each part. Have fun =)

Wednesday, April 1, 2015

Merging Vertex Points

Have you ever had a model that you wanted to be a little more pointy but you never knew how to do it? Well I recently found out how merge vertex points. 

1) Have a model.But make sure you can see the vertex points that way you're not merging the wrong point.

2) Next right click and move your mouse over Vertex. This will show you the vertex point throughout your whole model.

3) This step you have to be very careful with because if you don't do it right you won't find the button you need. move your mouse over a vertex point and click on it. Then press Shift and right click. After you do that then move your mouse up to where it says Merge Vertices. Now DO NOT release the button. Another set of options will pop up.

4) Here is the next set of options. Move your mouse down to where it says Merge Vertex Tool. Now you can let go.

5) This tool allows you to click on one point and merge it with another. So go ahead and click on a point. DO NOT LET GO and drag to another point as shown in the image bellow.

6) Now those two points have merged together and they will no longer separate unless you press undo or if you actually know a way to undo the merge. You can now merge any point that you want.

7) And you have a better looking model. But you have to be careful on how you merge you points because depending on which points you move will determine how your model will look. Have fun =)

Wednesday, March 25, 2015

Duplicate Tool

When you are making a model and you finally get one side of it complete and you want to make the other side the exact same way, a lot of people spend a whole lot of time just try to look back and forth trying to make the other side the exact same way. There is an easier way to do this though. You don't have to remake the whole other side or try to copy and paste. Just duplicate it and when you're editing one part on one side it automatically does it to the other side. Here's how you do it:

1) First you get your model. Mine is half a man. I have the arms, the legs, the head and the torso. 

2) Next, by hitting Alt and left clicking on your mouse, rotate your model so you can see the inner faces of your model. Then right click on your mouse and drag it over the Face option and then release. This will allow you to select different face on your model.

3) Then select all the inner faces. You can do this by holding down the Shift key and clicking on all the faces as shown in the image bellow.

4)Now you have it hallowed out and you can see the inside of your model.

5) Now right click again but this time drag your mouse over the Object Mode option and release. This will allow you to select the whole model.

6) After selecting your model, go to Edit and click on the box next to the Duplicate Special option. It is very important that you check the box and not just hit the option by it's self. You'll understand why in the next step.

7)The reason why it's important to check the box next to the Duplicate Special option is so this option box will pop up. Next to where it says Scale, in the first box, make sure it says -1 and not just one. This will allow it to mirror the first side of the model instead of just copying it. Also at the top make sure you click on where it says instance. Then hit apply.

8) This is what you should see now it duplicated and mirrored the first half but not the way we need it to be.

9) Select the second half and click on the move tool on the left tool bar and use the yellow arrow to position it in the right place to where it looks like an actual man.

10) Now you canmake any changes to any side and it will automatically do it to the other side. If you look in the image bellow you can see that I hovered my mouse over a part of the model on one side and it highlighted that same spot on the other side. Your model will always be symmetrical.

Now you have your 3D man =)

Wednesday, March 18, 2015

UV Mapping

UV Mapping takes a lot of patience if you are doing a very complicated and detailed model. I made mine as a box with my name around it and two smiley faces on the sides. Very simple.

1) The first thing you want to do is find the checkered UV Map Guide (the image bellow). If you are following along with me, then instead of looking for it on google just go ahead right click on the image and save it in your source image file. Don't know where that is? Follow the steps bellow the image.

(go to your documents library file and click on maya. Next click on projects, finally click on default. Click on sourceimages and save the image)

2) What you want to do is make a box. That's the easy part.

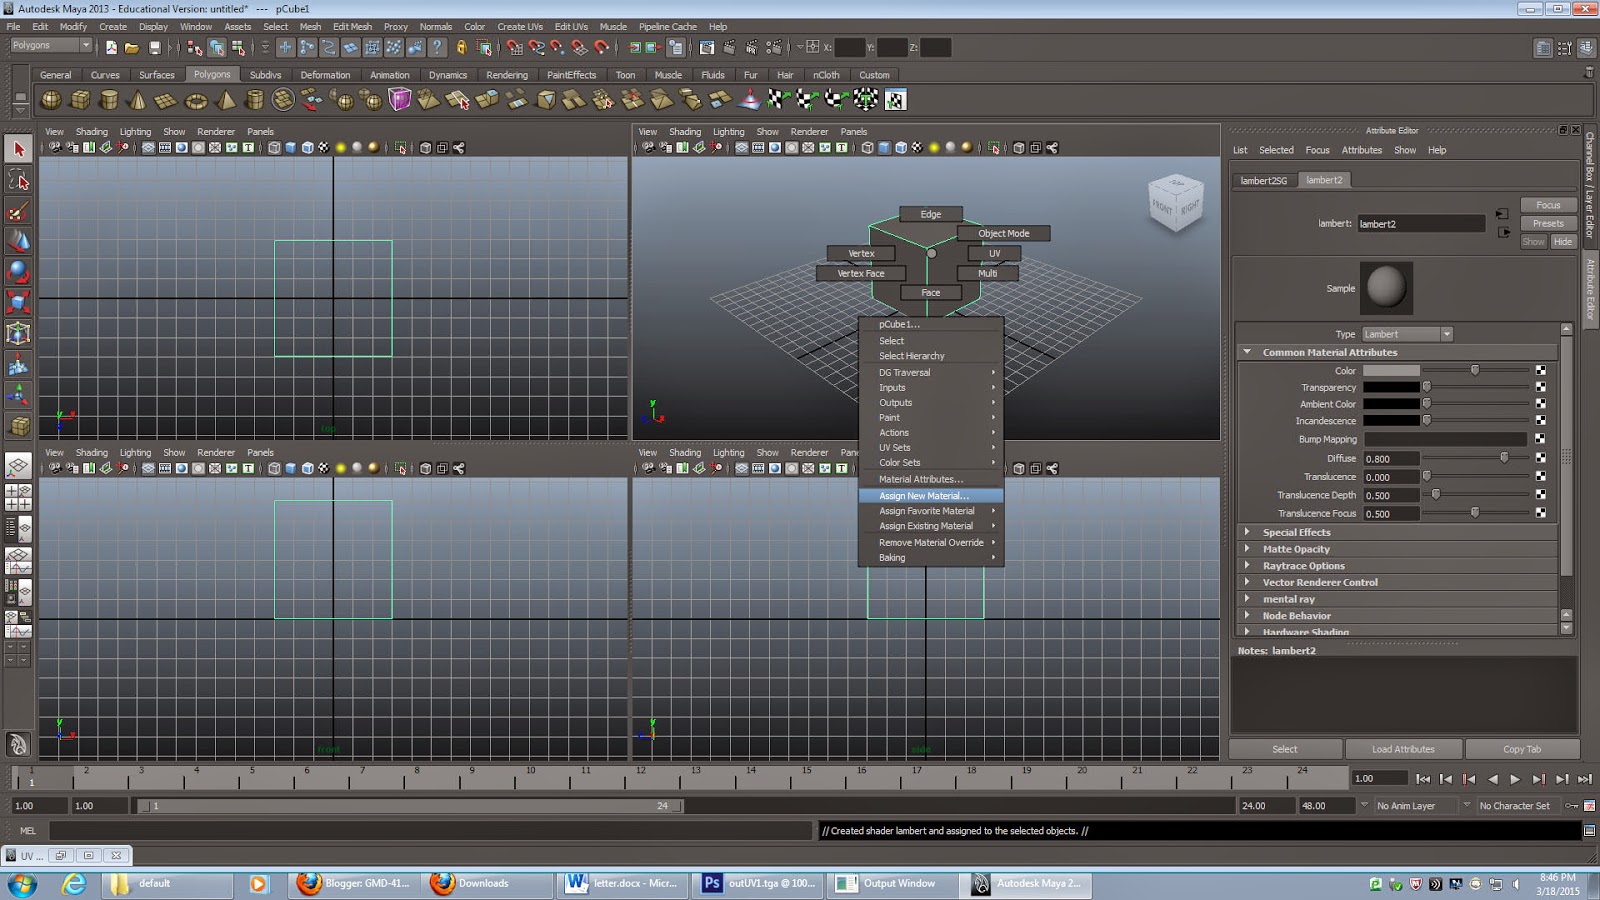
3)Right click on your mouse and hold and drag it down to assign new material. This will bring up the option box on the right. Right now what we are doing is placing the checkered map I had you save.

4)In the option panel on the side you can see that the first option says color. click on the little checkered box next to it. When another option panel click Lambert.

5) Click on the same checkered box once more. it doesn't show in the image bellow but another panel will pop up. Where it says image name, click on the little folder. Then when the option panel pops up click on file.

6) Once you've clicked on file click on the little folder once more. You will have to search for the checkered map. Again it's under sourceimages. 

7) Now, your box will not look like the one bellow right away. oh no, it's never that simple. before you lose your mind click on the little icon at the top that looks like a checkered sphere. Then you have your checkered box. Oh but we're not done yet.

8) Next, at the top under Edit UVs click on UV Texture Editor. What's going to pop up is the big red panel but it's going to have your checkered map. to get rid of that so you can see what your doing click on the display alpha channel icon (bottom row, icon third from last). Now since we are doing a simple box we don't need to do anything to it because the map is automatically set up perfectly. So click on Polygons and under that go all the way down to UV Snapshot. A little panel will pop up. Choose what size you want it and under image format save it as a Targa.

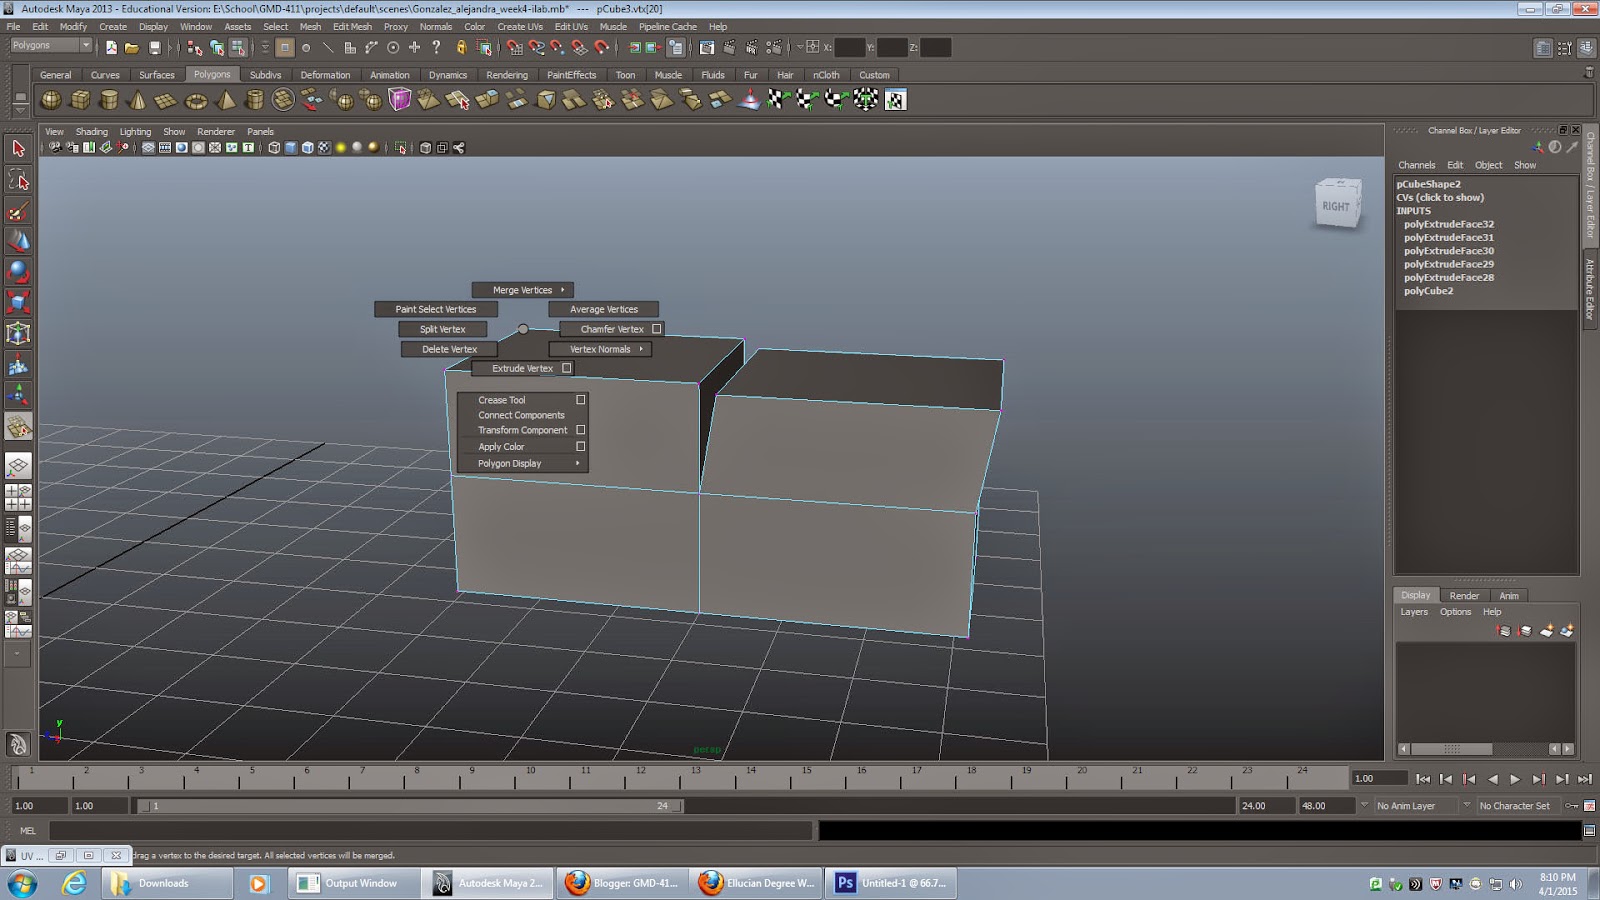
9)Now you can open your image in Photoshop (documents, maya, projects, default, images, outUV.tga) and fill in the boxes how ever you want. You can do anything from placing and image to drawing in your own. I drew in my name to where it would look right when it is folded. (My name is Alex not Lexa) Save your image as outUV1.tga (or name it whatever you want. that's just what you can save it as to follow the last step).

10) Go back into maya and click on your model. then click on the little folder once more and look for the image you just saved in photoshop (documents, maya, projects, default, images, outUV1.tga). Then you have your box  =)

Wednesday, March 11, 2015

Using the Extrude tool

Making 3D models is not easy, actually it's very hard. One thing you need to get used to is the Extrude tool. It took me hours to try to get it to do one thing. I couldn't get it until I saw my professor do it in less than ten seconds.

What I was trying to do was to make the extrude tool grab one face of a box and extrude it inward.

1) So I started with a simple box. 
(Those who don't know how to make one, choose the polygons tab and choose the box. It's the second icon)

2) Next right-click and and drag your mouse over Face and let go. This way you won't choose the whole object and you'll just select one face of the cube.

3) After that click on the top face, then click the extrude tool (it's the 16th tool from the left in the polygons tab) once you click on the extrude tool then click on the expansion tool on the left-side tool bar. Once you do that use the red and yellow handles to extrude the top face in.

4) Then click on the center top face and click extrude once more. Do not click on the expansion tool this time.

5) Finally, in the picture above you can see a blue handle. Click and drag that downward. This will make the box extrude down, making a hollow center.

6) Then your done and you just created your own hollowed out 3D box.